Potter Party is almost over (one left...then the one in the theater). Planning my week now, and I want to make a wreath for the mirror above my mantle. Here's the mantle when it was still decorated for Christmas...
I have found so many amazing wreaths I thought I would share my favorite tutorials on here.
One of my favorites i haven't tried yet is the Nona wreath from Jones Design Company, one of my favorites.
Here is what you’ll need:
:: fabric {I used a wool blanket found at a thrift store}
:: scissors
:: hot glue gun & lots of glue
:: wreath form {10 inch}
STEP ONE: cut fabric into long strips {approximately 2-3 inches x the length of your fabric}
STEP TWO: wrap one strip around wreath form to cover, adhering with hot glue
STEP THREE: Begin by bunching and scrunching each strip and adhering with dabs of hot glue.
Continue around the wreath until it is covered. This takes a lot of glue and some playing around to get the fabric bunched how you like. Keep going in rows from the outside to the inside.
STEP FOUR: create a hanger
cut a strip of fabric, loop over and attach to back with glue.
So pretty and quite simple too.
Love it. My next is also from Jones Design Company, the bookpage wreath. I made this one to originally go on the mirror, but the form I bought was too large, so it's hanging on my office door.
I have to say that this one is not an original project. Last year I was searching for something unique to make for my sister for her birthday and came across this tutorial. Since we’ve already established that I love book pages, this one was right up my alley. I loved it so much, I kept it for myself and bought my sister a shirt instead. Sorry, sissy.
I have mine hanging in my kitchen window so that I can enjoy it often:
It is the project I received the most requests for instructions on, so here I am to deliver.
Let me start by saying two things:
1. This is a very photo heavy tutorial. Hope you don’t mind.
2. This takes a LONG time to make {well, not as long as the painted wallpaper, but about 2 hours or so, which is long when you’ve got little boys wandering around the house bored out of their minds and you are doing everything you can to just finish the project already.
You are warned.
Shall we get started?
Here is what you’ll need:
:: styrofoam wreath form {mine is 10”}
:: book {I’ve found that thin pages {as used in my first wreath} work better than thicker pages {as used here} – think text weight paper vs. cardstock}
:: glue gun & glue sticks
STEP ONE: tear out the pages
STEP TWO: bend the page
Bend & roll into a shape similar to shown above.
I like the ripped out edge to show {it gives it that pretty ruffly look}.
STEP THREE: attach the back layer to the wreath form
STEP FOUR: glue down the layers
Or you could go this route and add glue to the middle of the folds before you attach to the wreath.
Keep going all the way around the wreath until you get this:
Flip it over to continue.
STEP FIVE: attach the next layer
bend
crease
figure out how long you want the paper to be {so that it is about equal with the layer behind}
crease
glue & attach.
Add a line of glue and glue down the extra paper.
Here’s what you’ll have:
STEP SIX: fold up and attach bottom layer
STEP SEVEN: attach the next layer
bend
figure out length
glue & attach
and you’ll have this:
STEP EIGHT: attach the next layer
and you’ll have this:
STEP NINE: attach the next layer
This time, the page will be attached to the inside perimeter of the wreath and the extra end of the page will be folded & glued under.
almost there!
STEP TEN: fill in the holes
Where there are spaces, add in another page. Use the same folding/bending technique, cut off the end
give it a little fold, add some glue
and press into hole.
Keep adding more until your wreath is full & fluffy.
STEP ELEVEN: add a ribbon to hang
You’ll need:
:: scissors
:: ribbon
:: pins
bend the ribbon into a loop & cut
attach to the back of the wreath using the straight pins
And it is done!
I . love . it
Here are some other gorgeous options:

{via}
{via}
{via}
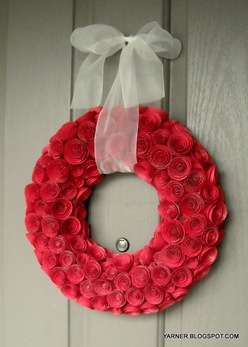
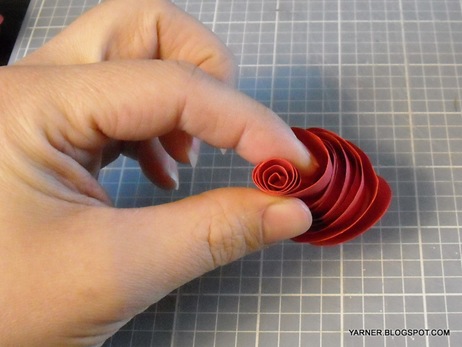
Amazing huh? Here's the one I'm going to try next from Im a yarner
Thank you for all your wonderful comments about this wreath. It is a bit time consuming, but totally worth it.
Supplies:
12 inch foam wreath
Cardstock – I used 8.5 x 11
scissors
hot glue gun
spray adhesive
glitter – I like Martha Stewart’s crystal fine glitter
1 1/2 yards sheer ribbon
Cardstock – I used 8.5 x 11
scissors
hot glue gun
spray adhesive
glitter – I like Martha Stewart’s crystal fine glitter
1 1/2 yards sheer ribbon
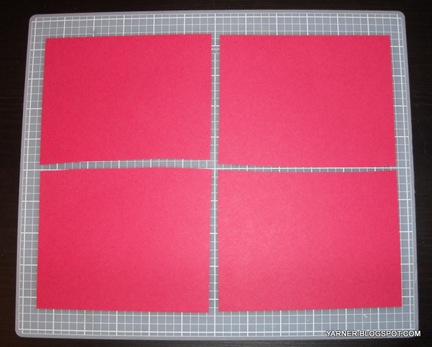
1. I made two different sized circles. For the large circles, cut the cardstock into four pieces.
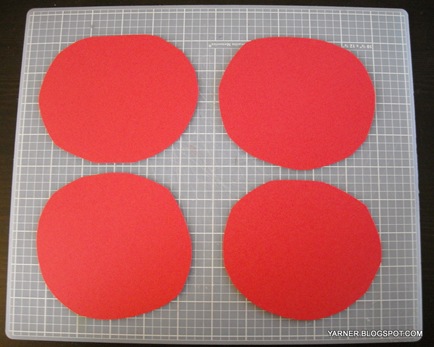
2. Cut each square into a circle. Doesn’t have to be perfect. Mine were ovalish, they both work.
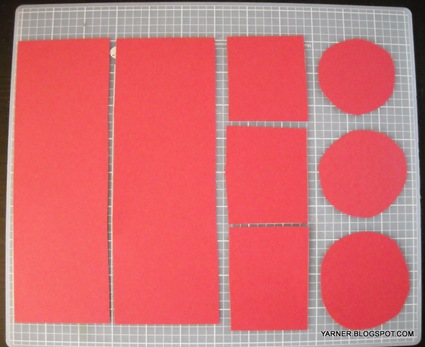
3. For the smaller circles, cut your cardstock into strips about 3 inches wide. Then cut each strip into three squares. Cut each square into a circle.
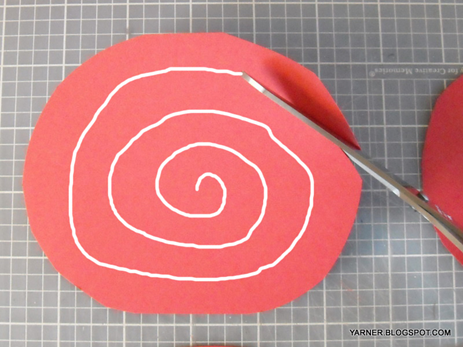
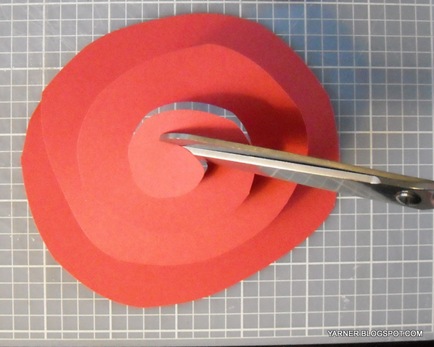
4. Cut each circle into a spiral, trying to keep the thickness even throughout. Mine definitely were not even, but it is helpful.
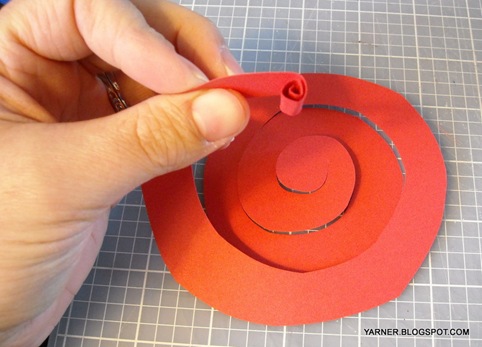
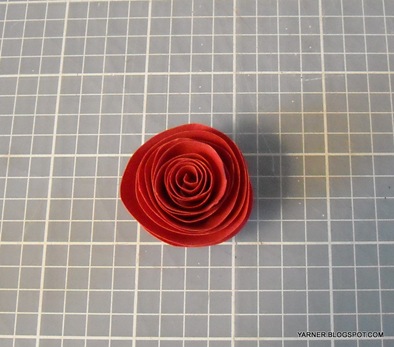
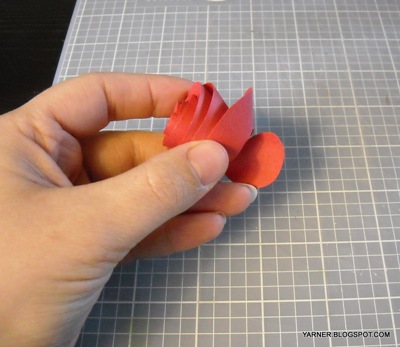
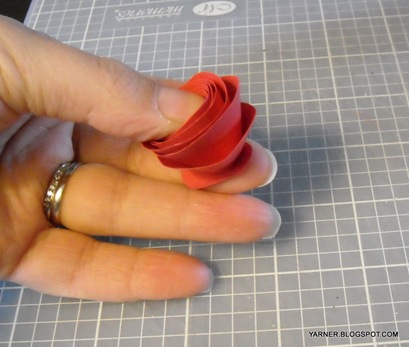
5. Once all the spirals are cut, start rolling the flower starting with the outside. Roll as tight as possible keeping the bottom edge aligned at all times.
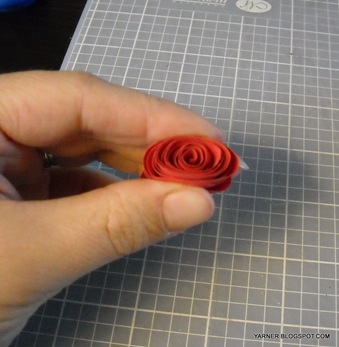
6. When it is completely rolled, pinch the flower together a little bit to help it hold it’s shape.
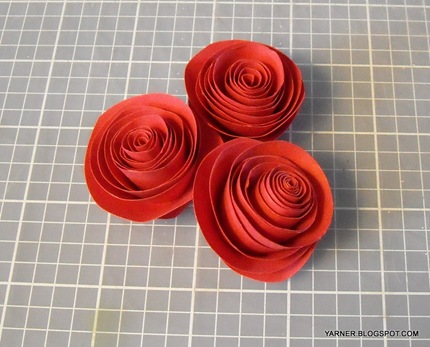
7. When you let go of your flower, it will spring open into shape.
8. Put a group of your flowers together on a sheet of newspaper and spray lightly with the spray adhesive. Then sprinkle your glitter on top. I was pretty generous with my glitter. Let dry at least 1/2 hour.
9. Hot glue the flower together by placing a little bit of glue on the bottom flap and then hold the flower in the shape you want while the glue dries. I found that if I left the individual flowers unglued, they would start to unwind and lose some of their shape after a few days.
10. Start gluing the large and small flowers on your foam wreath so that they are touching and showing as little of the foam as possible. You will probably have some little bits of the foam peeking through where you couldn’t fit even the little flowers. Continue with all your flowers and come back to that at the end. Once all the flowers are in place you can go back and cover some of the areas where a lot of the foam is showing. I took a left over glittered flower, pulled out a little bit of the middle, and tore it off from the rest of the paper.
11. I curled it as tight as I could and stuck it into the little holes in my wreath. If I needed more, I kept taking little bits from the left over flowers and wound them into little pieces.
12. I bought one and a half yards of sheer ribbon and wrapped it through the wreath and tied a bow at the top.
I'm going to try to make one like that with book pages instead of red roses. The red would be a great Valentines Day gift for a mom or grandma I think though. I made one similar for my Aunt for Christmas using chiffon rosettes instead. I didn't think to take a picture of the wreath but I do have one of her wearing it:
Here's one more I like made from Burlap from Whipperberry
I have been so impressed with some of the beautiful, yet simple, wreaths out in blog land. So…I thought I must make one of my own. I decided that my material of choice would be…
…you guessed it, burlap. I know, I know. I just love the stuff.
What you will need is…
- Burlap (the amount varies depending on the size of your wreath base. I used about 1 1/2 yards.)
- Wreath base (I used a 12 inch ring)
- Hot glue
- Spray paint to match the color of your burlap.
1. I spray painted the ring red so that the overall color of the wreath would be uniform. If you leave it white there is a chance the white will show through the burlap.
{Funny story…notice the tape? I broke the wreath when I gently tossed it on the ground to paint it. Be careful, those joints break easily!!}
2. Cut burlap into 5 inch squares.
3. Fold burlap in half and then in half again.
4. Holding the folded corner, round off the top of the square.
Your burlap will then look like this…
5. Grab the center of the burlap and gather to look like a flower.
6. Snip off the folded point of the flower.
7. Apply hot glue to the tip. {Don’t you just love the red fingers?}
8. Glue to the wreath base.
9. Repeat until your base is fully covered and looks like this:
I hope you love these as much as I do! I will post pictures when I finish the book page rosette wreath!





![WB_009[13]-2 WB_009[13]-2](https://blogger.googleusercontent.com/img/b/R29vZ2xl/AVvXsEjA6t3uO22caxU0EkLDg4_ExydqSrRCEbDpTqXMqSI6HtV_TdHxsEVGdQLkPbYjo1tDGwXceFESeeF91kTZbB4Xl4HdNdHaDqzAaRkd_7pVB-lG0q7B0Qn-akN8gzdRc2scs7yk_yR9b2t0/?imgmax=800)
![WB_064[4]2- WB_064[4]2-](https://blogger.googleusercontent.com/img/b/R29vZ2xl/AVvXsEiQ-c6F3GurJ_bYtvzENzoH9d86tC7-JWYxrjMLJxzvX2Sf5KS1xl7DLAZdMa7il2W7m0_3aO2gdcOWx77rzZ0cxKFDRWNR_Tpq-Y-oDBySzoucZAemv33778N6IQxtk1kdffB-9tPqAtRs/?imgmax=800)
![WB_067[4]2 WB_067[4]2](https://blogger.googleusercontent.com/img/b/R29vZ2xl/AVvXsEh6yyPVKvIn6Lod3fg62uFcYPN5Nm2b7BAa79KBusT-zw-ObBkGRNIOivt42-Gv9-P4OYbJnb5yDOqCPn8tWhvQyq0WNQ4QNWGiibcXkzg_lr-AE0FvwEdxkaYWgQ2XQJ5zUdncxsJj25LC/?imgmax=800)
![WB_069[4]- WB_069[4]-](https://blogger.googleusercontent.com/img/b/R29vZ2xl/AVvXsEi5ho-TrnmSmSWiEuGAkEDtczi9w4uf5ExmdzLtgsQo_RHEd6v08b6p_2XCIbcXbpT_-eC1_v1L5gKMn3qWgHIxaUlJuAIY4lWk4-qBp1hapvC_Uxr3LQKd-gHldx3b3Ya2gmqfRRaeQZiI/?imgmax=800)
![WB_071[4]- WB_071[4]-](https://blogger.googleusercontent.com/img/b/R29vZ2xl/AVvXsEjxOKN_uG-B5Gxohv0-nD-3QOYCJVdrjwp7otZ8yxjixWAG7gp1TAbCTGwVLaU9mQWXHN84Uiqu76PVBs_CnJCYyhKXUpt0QPXP28_i4QnG94sXtyWPuWCnMF73lg4pfShvU5Gd8YBRdAIF/?imgmax=800)
![WB_074[4]- WB_074[4]-](https://blogger.googleusercontent.com/img/b/R29vZ2xl/AVvXsEg1REb3Zj6q2lp4Wm40vesH93Bs9rXNRwRZ1ncwl84bK41ix_k_x-sWIiWqZTUGcIdM8kiXNcsvq0krlx98J904sNvsmZQr0nPU7SWLoi30OKmPKNUCApN8UEbJgadBDXXWjiitqGCostWy/?imgmax=800)
![WB_075[4]-- WB_075[4]--](https://blogger.googleusercontent.com/img/b/R29vZ2xl/AVvXsEjXTsE1cs7PXzSPHgskjWM-66BHYZpK9Xar97XbI-X7uM-2FPcBeWvC-MqggvXl0iKZ1fn4bi_xtjAqE_SpFOChyphenhyphen_TwpPO5V5luIpRdmIJXD5RCMrSKqd3U1OsglMt-QetQ_qMnc-oMSDSv/?imgmax=800)
![WB_078[7]-- WB_078[7]--](https://blogger.googleusercontent.com/img/b/R29vZ2xl/AVvXsEiaJG-XMB7zUtY2UHDsZ4n8yy0AVnSVSQFkPVgfOko03Y9NUR1TVeGT3hHZGoK4jOO1hCt7bMZOA34rOXf9unMoj3T_jJxViWaPWKd1DuzRYxDbEG1fA99qQBT-UHevxb_pFNvpR_GExZWl/?imgmax=800)
![WB_081[6]- WB_081[6]-](https://blogger.googleusercontent.com/img/b/R29vZ2xl/AVvXsEj2MGZfyXd_hUUVCphfq1yHocweTaZpbyrXlpG7XuDLfj4okKfmtZ-3cIMWP8DGPkHfdiqIHnRqHMsnpOJTEIXVMAP0iFlFmMUPC7tnV7ch1f2Z0-a9iykdJskPLinRRB-LtQJbx9GiCr44/?imgmax=800)
![WB_083[4]-- WB_083[4]--](https://blogger.googleusercontent.com/img/b/R29vZ2xl/AVvXsEj-LgVJXq1fuEzCgZkXT3WHwYLHVseDTLZlj6X83MEOpgkDWeeKZGerKhzZKK2cI1RNszRJe2S5Ab5TAzHidyeaDu2kBaRx2ZD31TqDa1yZ8FDFm0mvEf47IgroO7fRxr6oiVQxDPMfhk8Z/?imgmax=800)
![WB_085[4]-- WB_085[4]--](https://blogger.googleusercontent.com/img/b/R29vZ2xl/AVvXsEg0lXMYQ3MPDfCe9gZBn5nTlA2nNIypvvPKA1GKIU74ae_er6nwxblv3H0Oysn7IBbOnMUw93Q7r5lTLb0p4cE0SyJqVprkbpTwq_i0b8NGtMaL1CranFl6PNj4Jmv7vNDxSO8N4WzV58rO/?imgmax=800)
![WB_089[16] WB_089[16]](https://blogger.googleusercontent.com/img/b/R29vZ2xl/AVvXsEifu-yo-56MK_aIfE9daFijx3ktWVZWuY8I-57_CZeyMcjz1Jb1vPNH-m8n4sj_n4o77n92b5vbP6erhm4FBbEtgzvZ23bBwdCbfBQRwfKo3tguMI0L9EKRv2qo0A9ZB0oqbANFXC_tupfX/?imgmax=800)


1 Comment:
I LOVE the burlap wreath! I also love the one that you made mom! She hung it in the bathroom, and it looks perfect!
Post a Comment